Blackmagic Design just dropped DaVinci Resolve 21 at NAB 2026, and honestly, this one feels different. It’s not just another incremental update with a few polished edges. This time, they’ve added a full Photo page for still image editing, packed in eight new AI tools, and pushed deeper into immersive and VR workflows. Whether you’re a video editor, colorist, photographer, or someone who just wants a free editing tool that actually works, there’s something in here worth paying attention to. Let me walk you through the highlights and what they actually mean for your daily workflow.
The Photo Page Changes Everything (and Nothing)
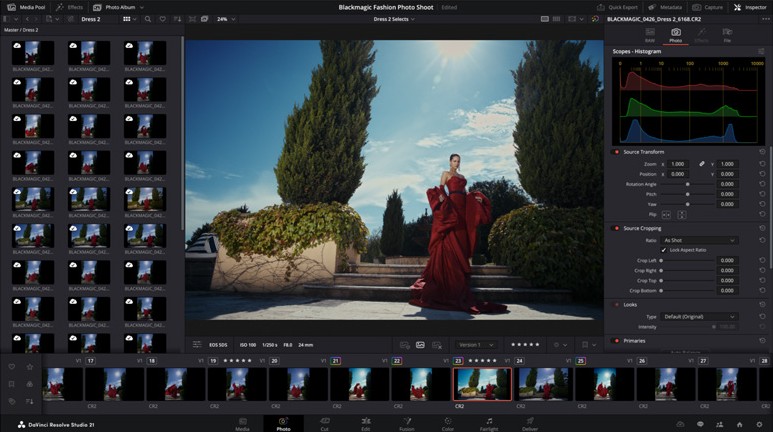
The biggest headline in DaVinci Resolve 21 is the new Photo page. Blackmagic has taken its node-based color grading engine, the same one used on Hollywood films, and made it work with still images. That’s a pretty bold move, and it positions Resolve as a direct competitor to tools like Adobe Lightroom and Capture One.
How Does the DaVinci Resolve 21 Photo Page Actually Work?
If you’ve ever used the Color page in Resolve, the Photo page is going to feel familiar. You can add nodes in series or parallel, apply different corrections to different parts of an image, and use shared nodes to apply the same look across an entire album. Every adjustment preserves the full quality of the original file, so you’re never degrading your source image.
There’s a LightBox view that gives you an overview of your entire album with grades applied. You can filter by graded, ungraded, star rating, flag, and clip color. It feels like Blackmagic studied what photographers actually need from a catalog tool and built it into their existing pipeline. AI Magic Mask also works on photos now, so you can do one-click masking of objects or people without switching apps.
That said, it’s worth keeping expectations in check. This is a public beta, and according to early hands-on reports from PetaPixel, the tools show promise but aren’t perfect yet. For photographers who live and breathe Lightroom, the Photo page probably won’t replace your entire workflow overnight. But for creators who already work in Resolve for video and want to grade stills in the same project, this is where things get interesting.
Camera Tethering and Album Management
Here’s something I wasn’t expecting. You can now tether a Sony or Canon camera directly to DaVinci Resolve for live image capture. Adjust ISO, exposure, white balance, monitor with live view, and save capture presets to lock in a consistent look before you even start shooting. Images save directly into an album.
For photographers who shoot tethered, this means you can capture, organize, and grade all within one app. That’s a pretty significant reduction in how many tools you’re juggling. You can also import Lightroom catalogs, which makes the transition a bit less painful if you want to try moving your existing library over.
Eight New AI Tools in DaVinci Resolve 21
Blackmagic has been a bit slower than some competitors when it comes to AI tools in real-world workflows. With version 21, they’re clearly playing catch-up, and honestly, the tools they’ve added are practical rather than gimmicky.
IntelliSearch and Slate ID for Faster Editing
IntelliSearch is probably the most useful AI addition for editors. It analyzes your media and lets you search for specific objects, spoken keywords in dialog, or individual faces using plain language. Results show up as whole clips in the Media Pool. If you’ve ever worked on a project with hundreds of clips and spent 20 minutes hunting for that one shot of a red car or a specific line of dialog, this is going to save you real time.
Slate ID is more niche but incredibly useful on set-heavy productions. It automatically reads your slate clapperboard and extracts the data as metadata. No more manually typing in scene numbers and take counts.
CineFocus, UltraSharpen, and Motion Deblur
CineFocus lets you click to define a focal point in a shot, then adjust the aperture and focal range to simulate depth of field. You can even keyframe it to create rack focus effects in post. The controls include aperture shape and bokeh, so the results look more like optical effects than a simple blur filter.
UltraSharpen is the tool you’ll reach for when footage comes in slightly soft, maybe from a lens that wasn’t quite dialed in, or from upscaled content. It’s designed to fix slight focus errors without introducing ugly artifacts. Motion Deblur tackles a different problem: those streaky, soft frames you get from slow motion or freeze frame effects. For anyone doing a lot of performance testing and benchmarking of cameras and lenses, these tools are going to come in handy.
Is the AI Face Age Transformer Worth Using?
This is one of those features that sounds wild on paper. The Face Age Transformer analyzes a subject’s face and lets you adjust an age offset slider to add or remove age-related features like wrinkles and facial fullness. There’s also a Face Reshaper for changing the shape and position of facial features on moving subjects, and Blemish Removal for skin retouching.
Honestly, for most people editing YouTube videos or short films, these are niche tools. But for commercial work, narrative projects, or anything where talent appearance needs adjusting in post, they fill a gap that previously required expensive plugins or After Effects workarounds. I can see these being really useful for specific jobs, even if they’re not something you’ll use every day.
Edit, Cut, and Color Page Improvements
The headline features get all the attention, but the page-level improvements in DaVinci Resolve 21 are what editors will actually feel in daily usage.
Better Keyframing and Graphics Support
Keyframing across the entire application has been reworked. You now get ease animations with loop, ping-pong, and relative modes. The curves editor has a normalized zoom mode that automatically scales curves to fill the available space. There’s also four-point Bezier easing for more complex video retiming.
The big quality-of-life win here is that Fusion effects can now be adjusted directly in the keyframe and curves editors of the Cut and Edit pages. That means you don’t have to jump over to Fusion just to tweak text, transitions, or motion graphics. For editors who avoid Fusion because of its learning curve, this is a welcome change.
DaVinci Resolve 21 also adds native support for Lottie animations and OGraf HTML graphics. You can drag .json and .lottie files directly into the media pool, and they’re treated as rendered animation clips with transparency. Text handling gets improvements too, with multi-language spell check, a font browser with previews, emoji support, and character-level styling within a single text box.
MultiMaster Trim Passes and Layer List Nodes
For colorists, MultiMaster trim is a big deal. It lets you generate multiple HDR and SDR deliverables from a single timeline. Instead of maintaining separate timelines for different output specs, you can grade once and create trim passes for each format. That’s a real time-saver on projects that need to deliver across broadcast, streaming, and web.
Node graphs in the Color page can now be viewed as a layer list, which makes complex grades easier to navigate. Group versions are also new. You can create and manage multiple grade versions within a group, affecting all clips uniformly. If you need to pull a clip out for individual grading, you can remove it from the group.
Fusion and Fairlight Updates
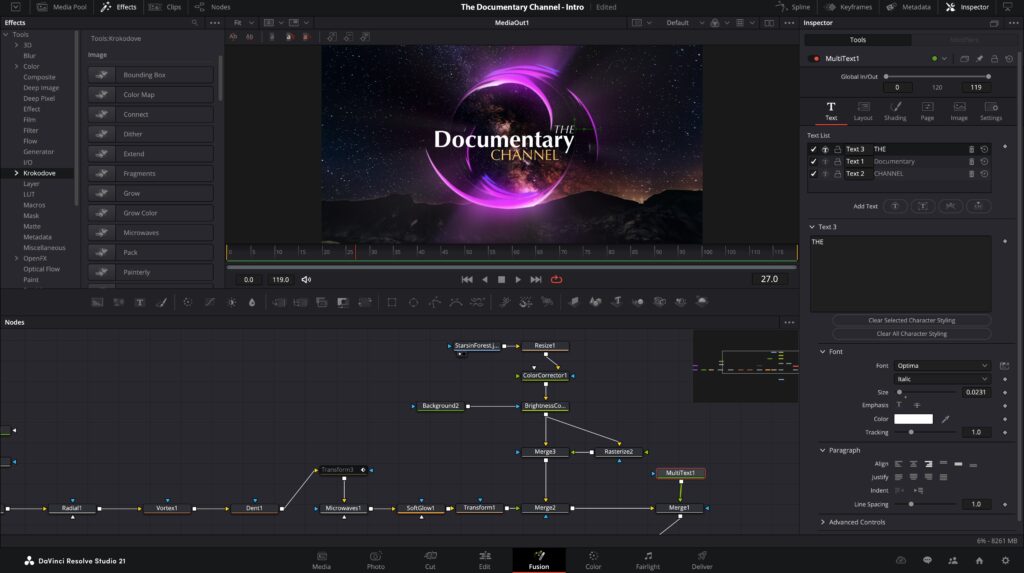
Krokodove Comes to Fusion
Krokodove is a popular library of compositing tools that Fusion users have relied on for years, and it’s now built directly into DaVinci Resolve 21. The collection includes over 70 new graphics, ranging from utility tools for productivity to customizable 2D and 3D templates. If you do any motion graphics or compositing work, this is a significant addition that saves you from hunting down third-party tools.
The macro editor also got a major refresh. There’s a new inspector view that makes building, formatting, and publishing custom tools and templates much faster. And here’s a creative one: the Fairlight Animator modifier connects Fusion to Fairlight’s audio engine, so you can drive animation parameters like eye and lip movement from audio levels. It opens up some interesting possibilities for audio-reactive motion graphics.
Fairlight Folder Tracks and Audio-Driven Animation
On the audio side, Fairlight now supports folder tracks. You can assign multiple audio tracks to a folder and collapse them into a single composite view. When collapsed, mini rectangles show you the number and duration of contained clips. Expand the folder when you need access to individual tracks.
For anyone working on complex audio sessions with dozens of tracks, this is the kind of productivity workflow improvement that makes a real difference. It doesn’t get the flashy demos, but it’s the type of thing that saves you from scrolling through a messy timeline.
What Immersive Formats Does DaVinci Resolve 21 Support?
DaVinci Resolve 21 has the most comprehensive immersive support the software has ever had. You can work with VR180 and VR360 formats and deliver directly to platforms like Meta Quest and YouTube VR. There are new delivery presets specifically for these platforms.
The immersive tools include spherical Panomap rotation for orienting VR media with more intuitive pitch, tilt, pan, yaw, and roll adjustments. Apple Immersive workflows now support foveated rendering, which simulates human vision by prioritizing high-resolution rendering only where you’re looking. That reduces GPU workload in peripheral areas and improves playback performance.
Rendering also gets a boost with MainConcept H.265 and MV-HEVC encode support for accelerated 2D and 3D renders on supported hardware. If you’re working in VR or immersive content, Resolve 21 is clearly where Blackmagic wants you to be.
Free vs Studio: Should You Upgrade?
What’s Free and What Requires Studio
This is where Blackmagic continues to be generous. The DaVinci Resolve 21 public beta is available to download right now for free. If you already own a Studio license, the upgrade to version 21 is also free, no additional charge.
The free version includes the core functionality across all pages, including the new Photo page. Studio, still priced at a one-time $295, unlocks advanced features like multi-GPU support, certain AI tools (including some of the neural engine features), advanced noise reduction, HDR delivery with Dolby Vision, and higher resolution exports beyond 4K.
For most people getting started or working on personal projects, the free version is going to be more than enough. If you’re doing professional software comparisons and trying to decide between Resolve and a subscription-based editor, the value here is hard to ignore. You’re looking at $0 to get started, or $295 once for the full Studio experience, with no recurring fees.
So should you care about DaVinci Resolve 21? If you’re already in the Resolve ecosystem, absolutely. The Photo page, AI tools, and workflow improvements across every page make this the most ambitious update in years. If you’ve been on the fence about switching from another editor, the free version alone makes it worth a try. Download the public beta, spend a weekend with it, and see how it fits your workflow.
What feature are you most excited about? Drop a comment below or share this with someone who’s been thinking about making the switch.

4 Responses
this for every think gude me
thnks for allthins gude for me